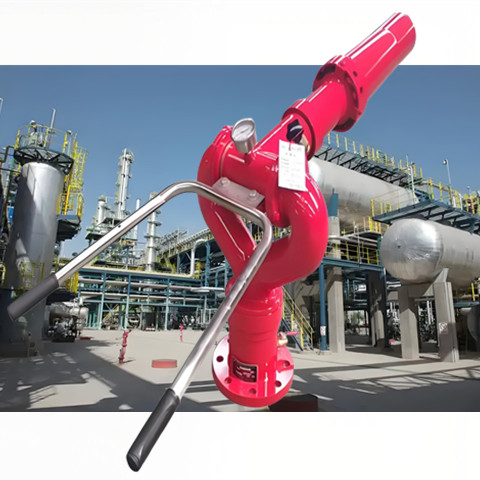
The installation of a foam firefighting cannon is a critical process that ensures optimal performance in emergency situations. Whether you're setting up a self-priming or non-self-priming model, understanding the proper installation procedures is essential. Below is a detailed guide on how to install a foam firefighting cannon, including considerations for different types of cannons and key components.

1. Preparing the Base
The first step in the installation process is securing the base of the foam cannon. It is crucial to ensure that the base is stable and level, as this will provide the foundation for the entire system. Make sure to check that the surface is free of debris and that all necessary bolts and tools are available.
2. Attaching the Flange
Next, connect the cannon to the pipe system by attaching the flange. Flange compatibility is a key consideration during this step. Make sure to check if the cannon flange is designed to meet ANSI (American National Standards Institute) or GB (National Standard of the People’s Republic of China) standards. The correct flange type ensures a secure and leak-free connection between the cannon and the water/foam supply.
3. Securing the Rotating Shaft
After the flange is in place, install the rotating shaft. This part is critical for the cannon's movement, allowing it to pivot and adjust the spray direction. Ensure that the shaft is aligned properly and securely fixed to avoid operational malfunctions. The shaft should be lubricated before installation to ensure smooth operation.
4. Installing the Pressure Gauge
A pressure gauge is essential for monitoring the water or foam pressure during firefighting operations. Install the pressure gauge on the designated port, ensuring that it is easily accessible for maintenance and checking during operations. The pressure readings will help you adjust the cannon's settings for optimal performance.
5. Determining Self-Priming or Non-Self-Priming Model
Before proceeding with further installation, it’s essential to determine whether the foam firefighting cannon is self-priming or non-self-priming. This distinction affects the next steps in the setup process.
Self-Priming Model: If your cannon is self-priming, it will be capable of drawing foam concentrate from a separate storage container. Ensure that the foam concentrate suction pipe is properly installed and that there is a secure connection between the pipe and the cannon.
Non-Self-Priming Model: A non-self-priming cannon requires foam concentrate to be supplied via an external pump system. Ensure that the foam supply line is correctly connected to the cannon, with no leaks.
6. Installing the Suction Pipe (for Self-Priming Models)
If you are working with a self-priming foam firefighting cannon, the installation of the suction pipe is a critical step. Attach the pipe securely to the designated inlet and make sure it is free of kinks or obstructions that might affect the flow of foam concentrate. Check that the suction pipe is positioned below the foam storage container to maintain a consistent foam supply during operation.
7. Final Checks and Testing
Once the installation steps are completed, conduct a thorough inspection of all components, including the flange, rotating shaft, pressure gauge, and foam concentrate suction system. Test the system by running water through the cannon to ensure there are no leaks and that the foam spray reaches the desired distance and coverage.
Conclusion
Proper installation of a foam firefighting cannon is vital to ensure its effectiveness during emergencies. Following these steps carefully will help you set up the system correctly and allow for reliable and efficient performance. Always refer to the manufacturer’s guidelines for specific installation instructions and safety recommendations.


